Overview
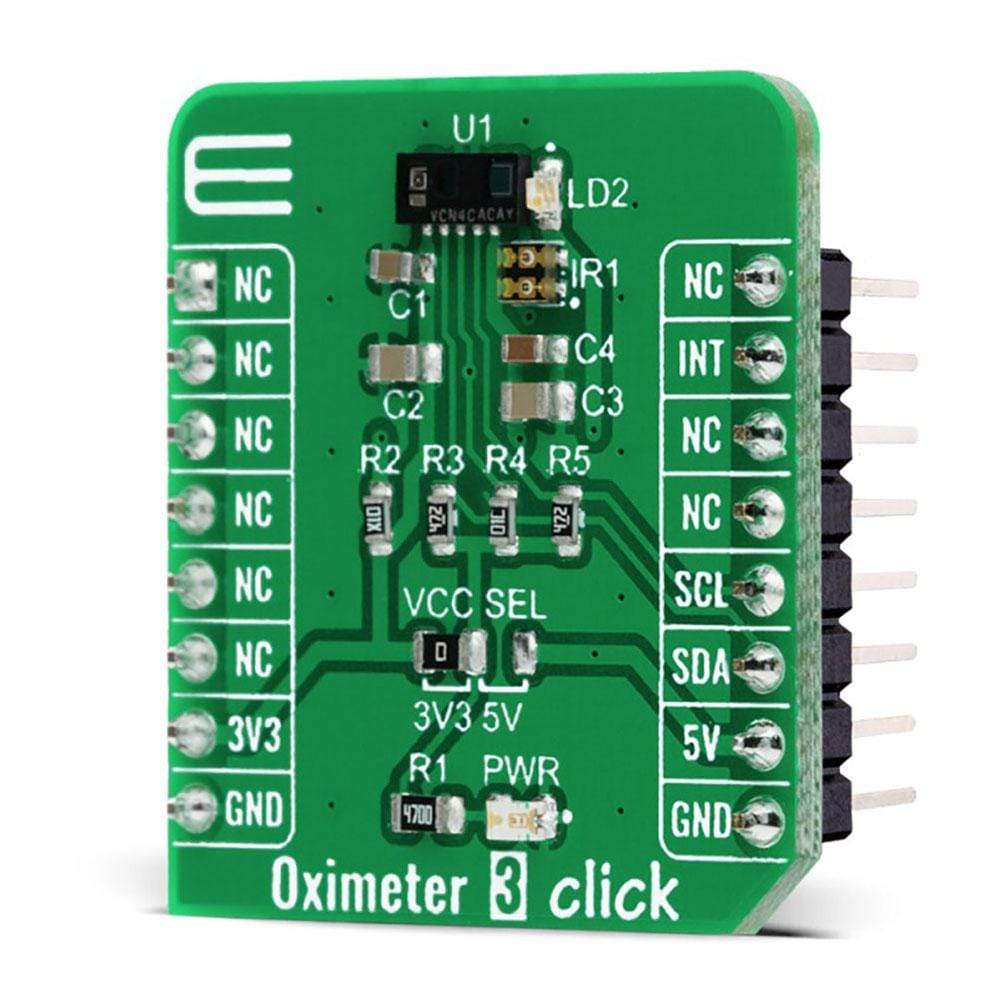
The Oximeter 3 Click Board™ is a compact add-on board perfectly suited for measuring the blood oxygen saturation. This board features the VCNL4020C-GS08, a fully integrated high-resolution digital biosensor from Vishay Semiconductors. It combines an infrared emitter and PIN photodiode for biosensor functionality, ambient light sensor, and signal processing IC in a single package with a 16-bit ADC. It supports standard I2C serial digital interface and has the programmable interrupt function that offers wake-up functionality when a proximity event or ambient light change occurs. This Click Board™ makes it an excellent choice for applications such as optical pulse oximetry and health monitoring.
The Oximeter 3 Click Board™ is supported by a mikroSDK compliant library, which includes functions that simplify software development. This Click Board™ comes as a fully tested product, ready to be used on a system equipped with the mikroBUS™ socket.
Downloads
How Does The Oximeter 3 Click Board™ Work?
The Oximeter 3 Click Board™ is based on the VCNL4020C-GS08, a fully integrated biosensor and ambient light sensor with an I2C interface from Vishay Semiconductor. The VCNL4020C-GS08 sensor comes with a built-in infrared emitter, and signal processing IC in a single package with a 16 bit ADC. It also has an ambient light PIN photodiode with close-to-human-eye sensitivity with excellent ambient light suppression through signal modulation. For biosensor functionality, it converts the current from the PIN photodiode to a 16-bit digital data output value, while for the ambient light sensing it converts the current from the ambient light detector, amplifies it, and converts it to a 16-bit digital output stream.

The integrated infrared emitter has a peak wavelength of 890 nm. It emits light that reflects off an object within 20 cm of the sensor and has a programmable drive current from 10 mA to 200 mA in 10 mA steps. The built-in infrared emitter and broader sensitivity photodiode also can work with the additional on-board green LED and IRLED as designed on this Click board™. As an additional light source true green color LED (VLMTG1300) with a 525nm peak wavelength is used, alongside an infrared dual-color emitting diode (VSMD66694) with 660 nm and 940 nm peak wavelength well suited for measuring the optical pulse oximetry.
The PIN photodiode receives the light that is reflected off the object and converts it to a current. It has a peak sensitivity of 890 nm, matching the peak wavelength of the emitter, and it is insensitive to ambient light. The VCNL4020C also provides ambient light sensing to support conventional backlight and display brightness auto-adjustment. The ambient light sensor receives the visible light and converts it to a current, and it has peak sensitivity at 540 nm and bandwidth from 430 nm to 610 nm.
The Oximeter 3 Click Board™ communicates with the MCU using the standard I2C 2-wire interface with fixed slave address compatible with all I2C modes (Standard, Fast, and High-Speed). It allows easy access to a biosensor signal and light intensity measurements without complex calculations or programming. It also generates programmable interrupt signal routed on the INT pin of the mikroBUS™, that offers Wake-Up functionality for the MCU when a proximity event or ambient light change occurs, which reduces processing overhead by eliminating the need for continuous polling.
The Oximeter 3 Click Board™ is designed to be operated with both 3.3V and 5V logic voltage levels that can be selected via VCC SEL jumper. This allows for both 3.3V and 5V capable MCUs to use the I2C communication lines properly.
SPECIFICATIONS
| Type | Biometrics |
| Applications | Can be used for applications such as optical pulse oximetry and health monitoring. |
| On-board modules | The Oximeter 3 Click Board™ is based on the VCNL4020C-GS08, a fully integrated biosensor and ambient light sensor with an I2C interface from Vishay Semiconductor. |
| Key Features | Low current consumption, onboard LEDs optimized for the oximetry measurements, high frequency bursts for biosensor signal measurement, programmable interrupt function, and more. |
| Interface | I2C |
| Compatibility | mikroBUS |
| Click board size | S (28.6 x 25.4 mm) |
| Input Voltage | 3.3V or 5V |
PINOUT DIAGRAM
This table shows how the pinout of the Oximeter 3 Click Board™ corresponds to the pinout on the mikroBUS™ socket (the latter shown in the two middle columns).
| Notes | Pin |  |
Pin | Notes | |||
|---|---|---|---|---|---|---|---|
| NC | 1 | AN | PWM | 16 | NC | ||
| NC | 2 | RST | INT | 15 | INT | Interrupt | |
| NC | 3 | CS | RX | 14 | NC | ||
| NC | 4 | SCK | TX | 13 | NC | ||
| NC | 5 | MISO | SCL | 12 | SCL | I2C Clock | |
| NC | 6 | MOSI | SDA | 11 | SDA | I2C Data | |
| Power Supply | 3.3V | 7 | 3.3V | 5V | 10 | 5V | Power Supply |
| Ground | GND | 8 | GND | GND | 9 | GND | Ground |
ONBOARD SETTINGS AND INDICATORS
| Label | Name | Default | Description |
|---|---|---|---|
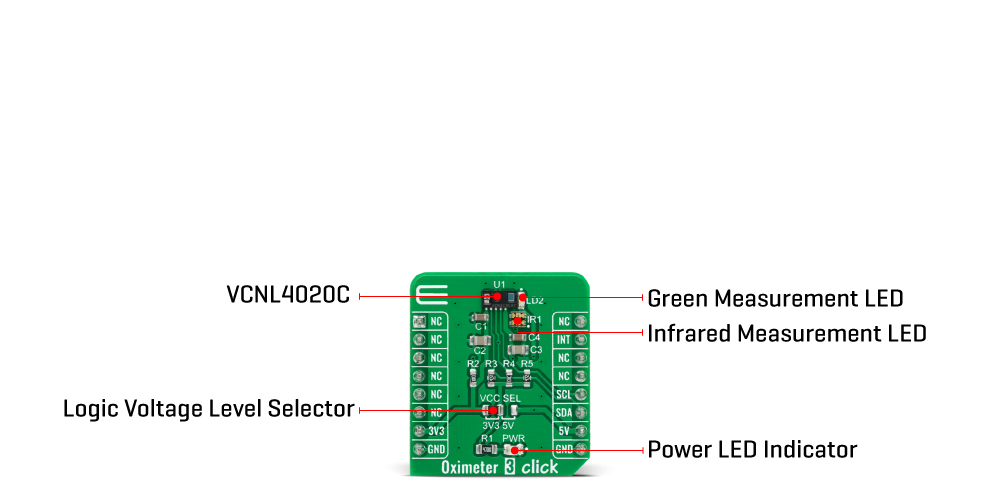
| LD1 | PWR | - | Power LED Indicator |
| LD2 | VLMTG1300 | - | Green Measurement LED |
| IR1 | VSMD66694 | - | Infrared Measurement LED |
| JP1 | VCC SEL | Left | Power Supply Voltage Selection 3V3/5V: Left position 3V3, Right position 5V |
OXIMETER 3 CLICK ELECTRICAL SPECIFICATIONS
| Description | Min | Typ | Max | Unit |
|---|---|---|---|---|
| Supply Voltage | -0.3 | - | 5.5 | V |
| Ambient Light Resolution | - | 0.25 | - | Ik |
| IR1 Infrared Wavelenght | 660 | - | 940 | nm |
| LD2 Green LED Wavelenght | - | 525 | - | nm |
| Operating Temperature Range | -25 | - | +85 | V |
| General Information | |
|---|---|
Part Number (SKU) |
MIKROE-4267
|
Manufacturer |
|
| Physical and Mechanical | |
Weight |
0.019 kg
|
| Other | |
Country of Origin |
|
HS Code Customs Tariff code
|
|
EAN |
8606027380341
|
Warranty |
|
Frequently Asked Questions
Have a Question?
Be the first to ask a question about this.

